Going to work on four more problems.
But first! Last time on Problem Solving I got the main ideas on the first one but failed to calculate that 1…g5 was the best option, am informed I got 2 and 3 correct, and bungled 4, undervaluing the pressure or 1.Re1. All in all a very solid result on complex positions. I sometimes say the best puzzle solving rate is the lowest your ego can handle, which is somewhere around 50%. But this isn’t quite right, as if you go much lower then you’re probably not engaging with/understanding enough of the problem to learn from the solutions. So I think the ideal rate is probably 50-75%, but if 50% feels terrible to you and 75% feels okay for your ego, try to find problem sets where it’s 75% not 50%! Anyway the main point of these is to find the ideas. Whether or not we pick the best move, let’s make sure we understand the possibilities.
Okay, onto the new four problems.
#5
Thoughts!
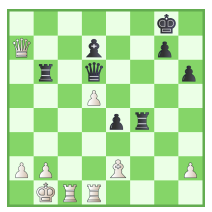
- This position strikes me as much more tactical than prior positions. All of black’s pieces are defended by just the queen, and are either on our half of the board (the f4 rook) or are already under some pressure (our queen attacks b6 and d7).
- Their king could potentially be exposed, we have a back rank check (relevant if we want to support c6, we’ll come back to this) and a light square diagonal that could open (if, for instance, we put something on c6).
- Okay as soon as your brain wants you to make a move really badly, in this case I want to try 1.Rc6 and see if the tactics work, you should start calculating! Even if the idea is real dumb you can learn about the position. I’ve also been doing a lot of combinations as training recently and so moves like this are on the mind.
- 1.Rc6 threatens everything so they must capture, there are no intermezzos here for instance 1…Qb4?? 2.Qxb6 and we win. The captures look great for us? If they capture queen we win a queen, and likely more, the queen was the only thing holding their position together. If 1…Rxc6 then 2.dxc6 (our rook is defended) skewers their queen and bishop 2…Qxc6 3.Qxd7 though actually 3.Rxd7 is probably better, I just make the simple no risk move automatically. Either way, we’re up a piece. Finally if 1…Bxc6 we have 2.Qxb6 regaining the rook and the bishop is pinned to the queen, we’re going to win a piece here too.
- Amusing that neither Qa8+ covering c6 nor Bc4+ using the diagonal that the pawn leaves via dxc6 were ever relevant! But this is often the case, ideas that cue us into a key idea may not be relevant to the actual execution.
Unlike last time I’m going to check the positions with a computer after thinking. And good thing too! A warning I need to think better, black has a resource here I ignored completely. I thought too much in the form of how does this work for me, and not what can my opponent do. After 1.Rc6 they have 1…Rxb2+! 2.Kxb2 Bxc6 3.dxc6 Qb4+ 4.Kc2 Rf5! and black holds in super complications. This is hard to find! I do wish I’d taken a little more time and considered …Rxb2+ though. Because our rook is hanging the material investment is smaller than it appears, black is losing a piece anyway and this way our king is very, very exposed. The best move for white is simply 1.Qc7! which I didn’t consider because I thought the tactical answer was game ending. So here’s a thing:
If you’re choosing between positional continuations you should compare the options and see possibilities. If, however, you evaluate a tactical sequence as completely winning there’s not much need to do so, unless you think it’s at high risk of falling apart if you missed something. Here I did not think that, and what I missed is perpetuals, which is not that high risk of an event. So given my evaluation, I don’t mind missing possibilities here. Had I ruled out Rc6 then I certainly should have checked a bunch of other ideas. As it was, I miscalculated a complex line.

#6
- There’s a lot of tension here, I actually played a game the other day with similar pressure against c6 and an a6 pawn questioning the lone defender of b7. As I recall I was winning but reacted terribly to the pressure and collapsed. Let’s try not to repeat that here! I also remember a game where opponent played, on consecutive moves, a4-a5-a7-axb7 and I resigned. He laughed afterwards, did I not see his threat? It was pretty funny (we’re friends, this wasn’t rude of him). The next time we played he knew I wanted a draw due to our tournament positions and on move 10 or so played a4 and when I responded …a5 he offered a draw saying I had stopped his go-to plan to beating me.
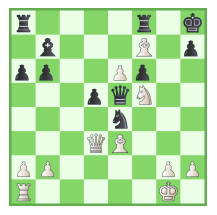
- The white bishops are very scary. My d5 knight however is extremely strong, unable to be ejected by a pawn from its post. Conversely white’s knight on f3 is very poor. We have to deal with immediate threats to our queenside falling part but should that be held together we may be in reasonable shape.
- What is the immediate threat? axb7 …Bxb7 helps secure our c6 knight at least for a little while and frees our a8 rook to enter the game. Is Bxc6 all that scary? We lose a pawn, sure, but white gives up the two bishops and we’re currently ahead a pawn anyway. It strikes me that this is only all that bad if white can invade immediately after, but with their light squared bishop gone I’m not too worried. This is to say I really don’t mind losing a pawn back if it frees our position. axb7 also threatens to win the e6 pawn though, distracting our bishop from defensive duties. I’d rather not lose that pawn because our d5 post is our saving grace.
- So I think our problem is not that white is destroying us this turn; it’s that our pieces are clumsy and undeveloped (though I am worried about axb7 and Rxe6). So what can we do that allows us to play …Bd7 and …Rc8?
- Well 1…Bd7?? 2.axb7 Rb8 3.Bxc6 is not the answer.
- How about 1…Nc7 attacking their bishop? Should they retreat we might have freed ourselves 2.Ba4 we can play 2…Nxa6 while against 2.Bc4 I think we can just about get away with 2…bxa6. Maybe trickiest is 2.Bf1 or the like, or perhaps 2.Qa4, maintaining pressure. Oh, there’s 2.axb7, duh, and we lose on c6. Oops.
- Of course we could just move our c6 knight away. The knight on d5 prevents c file invasion. So 1…Nce7 I believe threatens to take on a6. This is the most direct response to the danger and feels cleanest to me. Are there any downsides here? Well the biggest downside when I don’t hang a knight is axb7 and Rxe6. 1….Ncxe7 2.axb7 Bxb7 3.Rxe6 and now I’m worried about c file invasion after Bxe7 …Nxe7 Rc7 so I think we need …Rac8 or …Nf5 fighting for c7. It’s a bit ugly. This is not quite how I wanted to give back the pawn, the e6 pawn is a big loss.
- Can we move our knight without hanging e6? Yeah, if our queen recaptures on b7. Which means any other move (…Na5, …Ncb4, …Nb8) is possible here. They all feel deeply insecure to me though.
- If 1…Na5 2.axb7 Bxb7 they have 3.Qa4 and our knight is dead. So we must recapture knight, I think, on b7. I don’t see why I’d prefer this to 1…Nce7.
- After doing the above I got distracted and am now finishing the post, let’s take the above as my answer.
Okay answer time below.
The best move is 1…Ncb4, so I was on the right path but didn’t really consider it seriously. Unlike my choice of 1…Nce7 this applies some pressure to a6, but more importantly it allows …Qxb7 which is important to hold onto e6. I do think I had almost gotten there before taking a multi-day break from looking at this. Shame! The move felt loose to me though so I’m not sure I’d have been comfortable making it. On both these first problems I think I’m falling maybe not at the final hurdle, but near the final hurdle. Which is good! I think people that suggest doing the hardest thing are wrong; instead we should do something hard for us but where the answer is close to our reach, such that when we are told the answer – after the work we’ve put in – we can grasp what was hitherto ungraspable. We can learn!
#7
- We are down an exchange but their king has no squares and we have two mighty bishops.
- My first instinct is 1.Bd4 when if they couldn’t take our knight we’d have a fun finish, for instance 1…Qc7 2.Qxe4! dxe4 3.Bxf6#. Though actually, they could take on f7 on move 2 and I’m not entirely sure how good it is for us…
- No, it’s still good! We could recapture. 1.Bd4 Qc7 2.Qxe4! Rxf7 3.exf7 and they still can’t take our queen due to mate. So 3…Qxf7 when we emerge up a piece and a continuing attack after moving our queen.
- So 1.Bd4 is quite close to being really, really strong. 1.Bh6 also threatens mate, but I like 1.Bd4 more because if they take our knight on f5 we are more likely to be able to coordinate against f6 than our chance of being able to attack g7 which is needed for Bh6.
- 1.Bd4 Qxf5 2.Rf1 and where does the queen go? g5 and g4 are the two squares I see. Feels like g5 is clearly the choice, stays connected to f6. Now we can still consider 2…Qg5 3.Qxe4 dxe4 4.Bxf6+ Qxf6 5.Rxf6 and we’re… down a rook. More interesting is 4.Rxf6 when they cannot capture due to mate. I do think 4…Qg7 holds here, sadly, but 5…Rxf7 6.exf7 is very pretty and I think wins for us, for instance 6…Qg7 7.f8=Q+ Rxf8 8.Rxf8+ due to the pin. Black doesn’t have Qc1+ cause we block with discovered checkmate. Maybe they have 6…Kg7 though actually. Calculating is hard. I don’t think this works.
- I’m trying to make similar concepts work, sac the knight to get the bishop to d4 and rook to f1, then maybe take on f6 rook to force the knight there and build on it with Qf3 but they have …Kg7 there too.
- Starting with 1.Rf1 is a decent bailout. Evidently extremely useful, comes with huge threats, supports the knight. I’ve been doing a lot of combinations work recently and so my instincts are start with the forcing move.
- There’s a huge threat of Bd4 after Rf1 and it’s not clear how black extricates themselves. They can’t give back the exchange to end the pressure because 1…Rxf7 2.exf7 and the pawn is doing basically the same restricting work the bishop was.
- I feel like this is a mirror image of the first problem; there I thought I had a tactical solution so I didn’t look for what else to do because if it worked, and I thought it did, it’s game over. Here I couldn’t get the tactical solution to work so am picking the building option, but if a tactical option does work oh boy will this be suboptimal.
- Okay Rf1 final answer, I don’t see other tools.
Answer below.
So 1.Rf1 is probably winning but the computer prefers, somewhat, a move I didn’t consider at all. 1.Qf1!. I have a strong instinct to send the weakest piece to do a job that can do it, and also involve all the pieces. Both of these instincts meant I wanted to get that a1 rook working and didn’t consider the centralized d3 queen at all. But the d3 queen isn’t amazing (if we’re not sacking it for the knight, and we probably aren’t) and, perhaps more importantly, they don’t quite do the same job on f1. They both pressure f6 and defend f5, but the queen is a much more devastating capturing piece on f6 than the rook. Very interesting, I was never going to find this. Stronger players often check fewer moves than weaker players, because they automatically prune out various garbage moves. But sometimes, that pruning is wrong, and the very best players understand the exceptions. I don’t feel bad not finding 1.Qf1!, it’s not a move I can see. What’s the best way to start seeing moves you currently don’t? To engage with positions where they’re the answer, and then try to understand them when they’re brought to your attention. The next time a move like Qf1 is correct I won’t find it either. Nor, probably, the time after that. But if I keep being shown it maybe I get there eventually. I am now 0/3. That’s okay. Some problems, usually tactical, you want to solve a fairly high rate of. More strategic or mixed problems it’s okay to score much lower as long as you find key ideas and get far enough that when the answer is given it clicks.

#8
- Their rook is good, ours is not. Thus is the misery of rook endgames. So I think the huge question is can we play 1.Re1, giving up a pawn to activate our rook, or not.
- That’s not the only question though, we have a pawn majority on the kingside, can we crash through there? I am really skeptical of this, even in some ideal world where we get ourselves a passed h pawn and they can’t play …Rh2, a quite unrealistic world, I still have no idea how we get past a knight on h7. It is entirely possible we should do something with the kingside pawns before embarking on other operations, but I’m gonna rule out trying for a clear breakthrough here. Further, especially with our king so restricted, I like having the pawns somewhat close to our king such that they can’t be picked off.
- Before moving to our main question I also wonder if there’s a better place for our bishop. One thing I noticed is that while it has nothing to attack defending b2 is actually hugely important, if we give up the d2 pawn it means they can’t quickly sweep the rest of our pawns with …Rb2xb3. I’d like to keep the bishop on this diagonal. It may not have a stable home but it also doesn’t seem like I care much if they attack it, I can move it and none of the attack squares gain them much. We’ll worry about the bishop if it’s attacked. Also the stablest square that defends b2 is maybe Be5 in a vague sense – defended by a pawn, not attackable by a pawn – but specifically it means we can never invade on the e file should we try Re1 and their knight can harass it anyway. Our bishop also supports some invasion squares so even if their king was closer our rook could still get near the action. The one move that comes to mind here is Bg7 maybe we can force the knight to a more awkward square such that it doesn’t stop Re6+.
- So I think the question is do we play 1.Re1 or do we sit and do nothing? This depends on two things, firstly does Re1 actually do much, and secondly can black make progress if we move our king back and forth.
- Well black actually has a pretty big threat, 1…Rh2 with …Rh1+ as the big threat and …Rxh3 as a secondary threat. We could play h4 to secure the h pawn but I think this is weakening, easier to get a passed pawn later if we don’t, and we could meet …Rh2 with Re1 and something like …Rxh3 Kg2 …Rh7 Re8 or Re3. That looks very promising. So maybe …Rh2 is only a threat insofar as it forces Re1 …Rxd2 which we may be going for anyway. But this is to say I think we’re going to end up having to play Re1 eventually and hoping it brings enough activity. I know I’ve basically just talked about Re1 but there’s nothing else to really consider, we need activity.
- 1.Re1 Rxd2 2.Re8 Nd7 3.Re6+ Kb7 4.Bg7 is my mainline. I don’t know what’s happening there. A key point is if 4…Rd1+ 5.Kf2 d2 we don’t have 6.Ke2?? cause 6…Re1+ skewers our rook but I think 6.Rd6 is sufficient. This all strikes me as complex; a position I could lose with either side, and about equal.
I would play 1.Re1 and go for activity.
Answer next.
So I’m… right about many things but not quite right in execution. My eval was right and my line isn’t terrible but better is 1.Re1 Rxd2 2.Bg7! Nd7 3.Re6+ a better version of my line as it’s a full tempo ahead, the bishop doesn’t need to dodge the knight’s attack here and already has cleared the path to pressuring g7. White has a clear advantage.
One thing I noticed here is that I might, in a game, find the right line. I’d start 1.Re1 and I don’t actually think I need to see the best line to play it. Then, after 1…Rxd2 I’d think again and might find 2.Bg7 – it was an idea I mentioned to keep in mind! – or might not. Having a suboptimal line in mind here is not so important because I think I’d decide on Re1 quite quickly – the activity feels mandatory – and then next turn try to figure out how to best go for said activity. Maybe I’m just making excuses here.
Fun problems, enjoyed thinking about and talking out these positions. All my answers were wrong, but none of my answers were terrible, a still winning but less winning move, a few advantages thrown away, and an a pawn poorly dealt with.
